How to select the right binoculars  如何選擇適當的雙筒望遠鏡 (courtesy from TAS) 

有些人或許會覺得:看到一些天文同好們玩著大枝小枝昂貴的望遠鏡, 
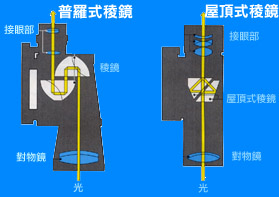
雙筒望遠鏡是有點玩具似的東西,其實不然,不管他有多猛的炮,每一個業餘的天文同好都應該有一枝不錯的雙筒望遠鏡,而如果你和小潔一樣是一位剛入門的同好,而預算又不是很多時,小潔倒建議你別把全部的錢一股腦投到鏡筒或赤道儀上,而應該買一枝不錯的雙筒望遠鏡和本星圖及幾本初學者的好書(更別忘了來小潔的只要天文看看)

[
雙筒望遠鏡的結構]
一般市面上雙筒望遠鏡的結構,可不只是兩枝折射鏡裝在一起那麼簡單哦,現在的雙筒望遠鏡主要可以由稜鏡的型式分成2種類型--屋頂式稜鏡(roof-prism)普羅式稜鏡(porro-prism) 或許你會問:那一種比較好?只要是對雙筒望遠鏡了解的人都會告訴你:"普羅式的",沒錯,在其他條件都一樣的情況下,普羅式的稜鏡的確比屋頂式更能夠提供你較為明亮.銳利.的影像

[普羅式雙筒望遠鏡] Porro prism binoculars
普羅式又可細分為德國式(German)和美國式(American) 

[屋頂式稜鏡與普羅式稜鏡的分別]

屋頂式稜鏡,當然是長得像屋頂形狀的稜鏡(廢話!),有一層內面鍍上鋁(或其他金 

屬,但通常是鋁)以反射由物鏡接收進來的光 ,而有一小部分的光便在這個時候損

失掉了,而造成了較暗的影像;相反地,品質夠好的普羅式稜鏡不需要反射的鏡面

便可以完全反射所收集到的光.而另一個屋頂式的缺點便是其高昂的價格,一部分

的原因起因於其在安裝時所需要的高精密度,就我們觀測星空而言,就算是最好.

最貴的屋頂式望遠鏡,其影像的品質仍然比不上同口徑的普羅式雙筒望遠鏡

[你該知道關於雙筒望遠鏡的常識]
[放大倍率&口徑]
所有的雙筒望遠鏡上至少都該有2個數字,像:7╳50或是11╳70等..要了解你的雙筒望遠鏡,當然要先知道這兩個數字所代表的意義

7

50

"7"代表這枝雙筒望遠鏡的放大倍率是7倍


"50"代表這枝雙筒望遠鏡的口徑是50(mm)


很多人都有這種觀念:以為放大倍率愈大就表示這枝雙筒望遠鏡愈好,其實並不盡然,愈大的放大倍率雖然可讓你在望遠鏡裡看到愈
大的東西,而伴隨而來的則是較為昏暗的影像,當你想買雙筒望遠鏡時,最重要的便是考量你的用途及預算,來選擇一枝適當口徑&
率的雙筒

[光瞳徑(Exit Pupil)]
在這裡就得先提到一個名詞:光瞳徑(Exit Pupil)所謂的光瞳徑,就是口徑(mm)除以倍率,也就是進入雙筒望遠鏡的光從目鏡射出時的直徑,如果一枝雙筒望遠鏡的光瞳徑愈大,就表示你可以從這雙筒裡得到愈明亮的影像,而人類剛出生的時候的瞳徑大約為7mm,所以雙筒望遠鏡的光瞳徑最好做到7mm,正可以得到最明亮的影像,如果再大反而有一部分的光無法進入瞳孔,反而會使影像變得模糊了,如果你買雙筒的用途只是用來看看棒球賽或賞鳥,當然用到這望遠鏡的時候都是白天陽光大的時候,小潔就會建議你買枝光瞳徑不用很大的雙筒,以換得較大的倍率,看起球來當然也會比較清楚啦,但我們這裡談的是天文觀測用的雙筒,要觀測的東西常是昏暗的星體,所以雙筒的光瞳徑最好是7mm,如市面上常見的7x50,10x70之類的雙筒,不過小潔倒是覺得:太大的光瞳徑反而不太好用,第一大部分的人和小潔一樣有近視,而且年紀大了,瞳孔大概很難張到麼大,其二:常在都市中用7x50的雙筒看東西時,太大的光瞳徑反而讓視野裡一片明亮,收集光害的能力是太強了些,而且放大倍率太小,看起來總覺得有點不太過癮說,所以小潔寧願買10x5018x70之類的雙筒,不過相對地,你拿雙筒就得穩一點了

[鍍膜(Coating)]
如果是想要選購一雙好的雙筒,其鍍膜也是很重要的,而鏡片釨端端的為什麼要鍍膜咧?其實是為了減少光線的散失(即增加透
光率)當一片未鍍膜的鏡片在光線通過時,會因為反射而有大約4%的光線散失,而如果在鏡片的兩面都鍍上一層薄薄的氯化鎂
MgCl2 其光線的損失率就可以減少到1.5%左右,所看到的影像當然也就明亮得多,也比較不會有炫光的產生, 而適當厚度的
MgCl2 鍍膜是呈現紫色的,如果太厚看起來就是綠色,太薄看起來會有點粉紅色的,而現在各雙筒望遠鏡廠商大部分都有自己的
一套多層鍍膜法,所以妳看到的雙筒望遠鏡鏡片就會有五顏六色啦,至於各家廠商的鍍膜如何還有優劣...這就不是小潔能力所及
的地方啦。不過有一點希望大家注意,大家或許都曾經在路邊攤或廣告裡看過那些看起來很厲害的"紅寶石鍍膜"希望大家不要被
騙啦,這種紅得發亮的鍍膜只會讓影像喪失原有的色調及變暗,反而會造成反效果。


Choosing Binoculars for Stargazing
By Alan M. MacRobert  (Courtesy Sky & Telescope)

Any optical aid will bring deeper views of the sky than the naked eye, and any binoculars that happen to be available, no matter how poor or small, are enough to launch a rewarding observing program. But some kinds are much better for astronomy than others.

The variety of brands and models on the market can be bewildering. Prism binoculars of the same basic type made today have been sold commercially for 100 years — so manufacturers have long since discovered and incorporated every easy improvement that is possible. With one notable exception, this is a very mature technology. (That exception, image-stabilized binoculars, allows you to use smaller binoculars and higher magnifications than conventional wisdom suggests — albeit at a cost. But the tests and concepts that follow apply to them too.) Therefore, when a particular model offers special advantages, you can expect these to be offset by corresponding disadvantages, either in performance, convenience, or price. Choosing the right instrument for your purpose is a matter of choosing where to compromise. The following guidelines will help. 

Magnification and aperture.Every binocular has a two-number designation, such as 6×30 or 8×50. The first number is the magnifying power or magnification. The second is the diameter of the objective (front) lenses in millimeters — the aperture of each lens.

Beginners usually assume that the higher the power the better. Higher powers are indeed generally preferable; they penetrate light pollution more effectively and are especially desirable for double stars, star clusters, and certain other objects such as the moons of Jupiter. But high power also narrows the field of view (making it harder to find your way among the stars), and, worst of all, magnifies the dancing of the stars when the instrument is held in the hands. For this last reason, 10 power (10×) is the maximum usually recommended for hand-held binoculars — unless they are image-stabilized binoculars, which contain special mechanisms to counteract jiggling.

As regards aperture: the bigger the objective lenses the brighter the stars, and here the astronomer should compromise least. Most astronomical objects are hard to see not because they are small and need more magnification, but because they are faint and need more aperture. A pair of 8×50s collects twice as much light as all-purpose 8×35s, and hence makes everything appear about 0.7 magnitude brighter. The corresponding disadvantage of the 8×50s (aside from higher price) is that they are bigger and heavier, making them less appropriate for prolonged daytime use. For hikes or birdwatching the 8×35s would be the better choice — or even 7×30s or 6×24s, sacrificing both power and aperture for light weight and convenience. And image-stabilizing technology enables small binoculars (10×30s, say) to perform as well as larger handheld ones (7×50s, say).

Focusing. Most binoculars are "center-focus," meaning you turn a knob in the center to focus both eyes at once. The right-hand eyepiece is also individually focusable so you can correct for differences between your eyes; in theory this only has to be done once. Center-focus binoculars are convenient for birdwatchers and others whose targets often shift from near to far.

But astronomers don't need this feature. Everything in the sky is at the same "infinity" distance as far as focusing is concerned. So you can save both money and mechanical complication (with its increased likelihood of problems) by choosing individual focus binoculars. With these you focus each eyepiece separately.

Quality vs. price. Suppose you've decided on 8×50s — a fine all-around choice for astronomy. You may find three similar-looking instruments offered for US$49, $180, and $1,000. Do these prices really reflect the range of value?

This is a matter of opinion, though it's certainly true that a pair costing 20 times more than another won't show 20 times as much. Away from the price extremes, say in the US$75 to $400 range, you basically get what you pay for.

Some manufacturers offer different lines of binoculars having poor, moderate, and good quality (in sales talk: "good," "better," and "best") to provide a selection of prices and values. A cheap instrument may be the best buy for a casual user. But quality is very important in the stringent applications of astronomy, so the amateur should consider the better grades. However, having decided on a make and model, you may get a bargain on it by checking with discount stores and dealers.

Used binoculars can be bought at huge savings at yard sales, second-hand stores, and pawn shops, but you risk getting stuck with a lemon. The following tests, which can be done in less time than it takes to read them, will enable you to judge the value of any binoculars, new or used.

The best binoculars have round exit pupils (the white disks of light seen here) with sharp edges. Soft edges or squarish exit pupils indicate that light is being lost somewhere in the optical assembly. 
SkyWatch/ Craig Michael Utter
Testing Binoculars

1. Pick up the instrument and compare its overall workmanship with other brands; some will seem better made than others. Hold the two barrels and try to twist them slightly. If there is any play in the joints or anything rattles, reject the pair. Move the barrels together and apart; the hinges should work smoothly, with steady resistance. So should the focusing motions for both eyepieces. On center-focus binoculars, the eyepiece frame should not tilt back and forth when you turn the focus in and out.

2. Next, look into the large objective lenses with a light shining over your shoulder so the inside of the barrel is illuminated. Reject the pair if a film of dirt or mildew is visible on any glass surface. (Dust on the outside is not a problem.) Look at the two reflections of the light from the front and back of the objective lens, which will appear to float a little above and behind it. If the lens is antireflection coated — as it should be — both reflections will have a blue, purple, amber, or greenish cast, instead of white. Move the binoculars around until you see a third reflection deep inside, from the first surface of the prisms. This too should be colored, not white. Then, still looking in the front, aim the eyepiece at a nearby light bulb and move the glasses around to view a row of internal reflections. The ratio of colored to white images suggests the percentage of coated to uncoated surfaces. 

The coatings increase light transmission and contrast, both of which are especially important in astronomy. "Multicoating" is the best kind. In top-notch models, all glass-to-air surfaces are multicoated.

Don't take vague advertising terms such as "fully coated" too literally; this could mean one lens is "fully" coated and the rest are not.

3. Turn the binoculars around and repeat your examination of lenses and coatings from the eye end. Then, holding the glasses a foot or so in front of you, aim them at the sky or a bright wall. Look at the little disks of light seen floating just outside the eyepieces. These are the exit pupils. If they have four shadowy edges, rendering them squarish instead of round, the prisms are not the best and are cutting off some light. In good binoculars the exit pupils are uniformly bright to their round edges. Also, they should be surrounded by darkness, not by reflections from inside the barrels.

4. Finally, look through the binoculars. Adjust the separation of the barrels to match the separation of your eyes, then focus each side separately. A noticeably filmy or gray image indicates an unacceptable contrast problem. If you have to wear glasses to correct for astigmatism, make sure you can get your eyes close enough to view the full field with the glasses on. If your glasses do not correct for astigmatism, you can take them off.

Each barrel should point in the same direction! If you see a double image or feel eyestrain as your eyes compensate for the binoculars' misalignment, you have a reject. The eyestrain would soon become a real headache.

For a better test, first make sure the barrels are adjusted exactly for the separation between your eyes, then look at something distant through the binoculars. Slowly move them a few inches out from your eyes while still viewing the object. It should not become double. This test is a bit tricky because your eyes will automatically try to fuse a double image. At the same time, even a correctly aligned pair of images will look double for a brief moment before your eyes get them into register.

Misalignment due to flimsy prism supports is the worst problem of cheap binoculars; even a small knock can render a working pair worthless. More expensive instruments should survive minor accidents better.

Notice the size of the field of view: the wider the better. But the edges of a wide field usually have poor optical quality. Sweep the field at right angles across a straight line, such as a door frame or telephone wire. Watch whether the line bows in or out near the edges. This distortion should be slight.

Look at sharp lines dividing light and dark, such as dark tree limbs or the edge of a building against a bright sky. Do they have red or blue fringes? No instrument is perfectly free of this chromatic aberration, but some are better than others.


The Pleiades star cluster is not just an attractive binocular target; its bright, closely clustered stars can help you compare the performance of different pairs of binoculars. Courtesy Akira Fujii.

Alan MacRobert is a senior editor of Sky & Telescope magazine and an avid backyard astronomer.
Under the Stars

A star at night is the most stringent test of optical quality, so try the binoculars on real stars if you get a chance. If not, look for an "artificial star" such as sunlight glinting off a distant piece of shiny metal. Center it in the field of view. Looking with one eye at a time, can you bring it to a perfect point focus? Or, as you turn the knob, do tiny rays start growing in one direction before they have shrunk all the way in the direction at right angles? This astigmatism is especially bothersome when viewing stars, and binoculars that are completely free of it can be forgiven some other faults.

Move the star from the center of the field to the edge. It will go out of focus unless you have a perfectly flat field and freedom from various other aberrations. As a rule of thumb, no degradation should be visible until the star is at least halfway to the edge of the field.

After running through these tests with several binoculars, you will have an excellent idea of their relative value.

One last word: Don't be discouraged if you can't find (or can't afford) perfection. Success in amateur astronomy depends more on attitudes than instruments. This was driven home to me some years ago after I moved into downtown New Haven, Connecticut. The sky seemed hopelessly light polluted, my pair of 7×50s was mediocre, and there was no place to use them except through a plastic bubble skylight in the roof of my apartment. The plastic turned star images into shapes I felt no proper amateur would deign to look at. But they were there, all right, and I was so intrigued at being able to see them at all under such conditions that I kept at it. It turned out that stars could be detected down to 8th magnitude, and I wound up spending nearly a year following variable stars, hunting clusters and doubles, comparing stellar colors, and becoming more familiar with the sky than ever before. So take what you've got and enjoy it.

home | profile | what's new | product catalog | products in stock  
 
test report | price list | astro journey |
Takahashi
  gallery | site map | customer | links